Access & Authentication
Reaching the dashboard, the first-launch security flow, and every layer that can sit between an attacker and the host: password + TOTP, JWT sessions, long-lived API tokens, HTTPS, reverse proxies, Secure Gateway, and the optional Fail2Ban jail.
Authentication is opt-in
Reaching the dashboard
ProxMenux Monitor binds to 0.0.0.0:8008. There are three common ways to reach it:
# 1) Direct on the LAN
http://<proxmox-ip>:8008

# 2) Behind a reverse proxy with a dedicated host name (recommended off-LAN)
https://monitor.example.com

# 3) Through Secure Gateway (Tailscale) — same LAN URL, from anywhere
http://<proxmox-lan-ip>:8008      # works from any device on your tailnet
Direct access matches what the systemd unit ships out of the box. The reverse-proxy and Secure Gateway sections below cover the other two. The Monitor honours X-Forwarded-For, X-Forwarded-Proto and X-Forwarded-Host so URLs and CORS work behind any of them without manual configuration.
First-launch flow
The first time you open the dashboard, the frontend calls GET /api/auth/status. If the auth config has never been written (configured: false), a single dialog appears titled "Protect Your Dashboard?" with two choices:
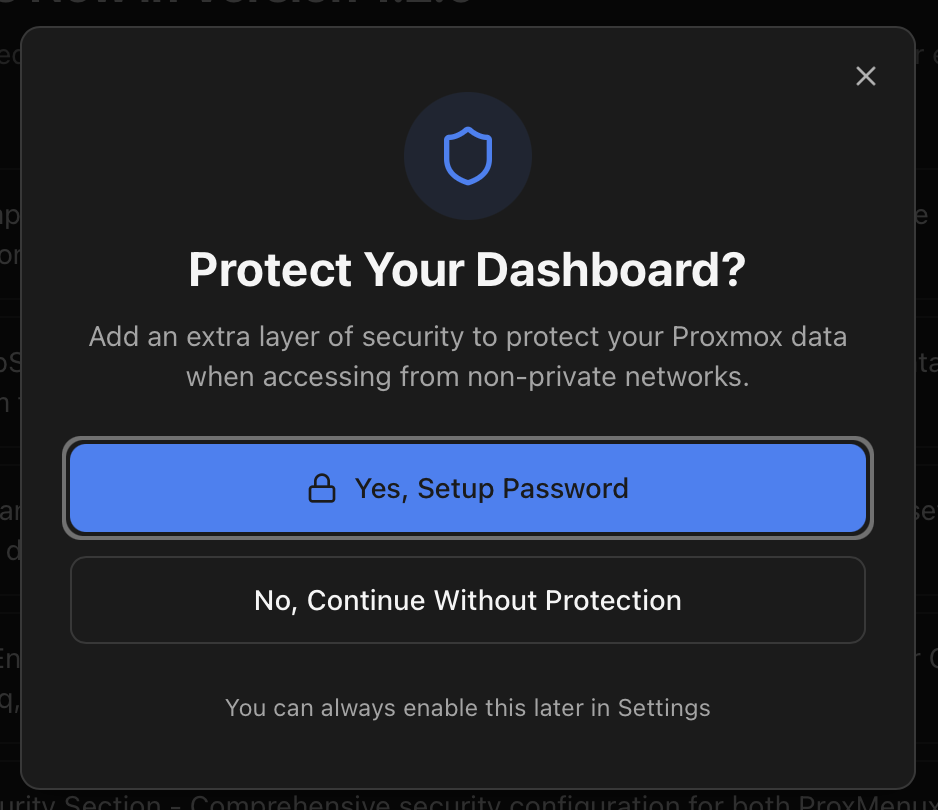
| Button | What happens | API call |
|---|---|---|
| Yes, Setup Password | Opens a form with the mandatory username + password and an optional display name + avatar image. Stores them in auth.json with enabled: true. Returns a JWT so you're logged in immediately. The form is documented in detail below. | POST /api/auth/setup |
| No, Continue Without Protection | Marks declined: true in auth.json. Every API endpoint is publicly accessible until you change your mind from Settings. | POST /api/auth/skip |
2FA is configured later, not here
Creating the first user
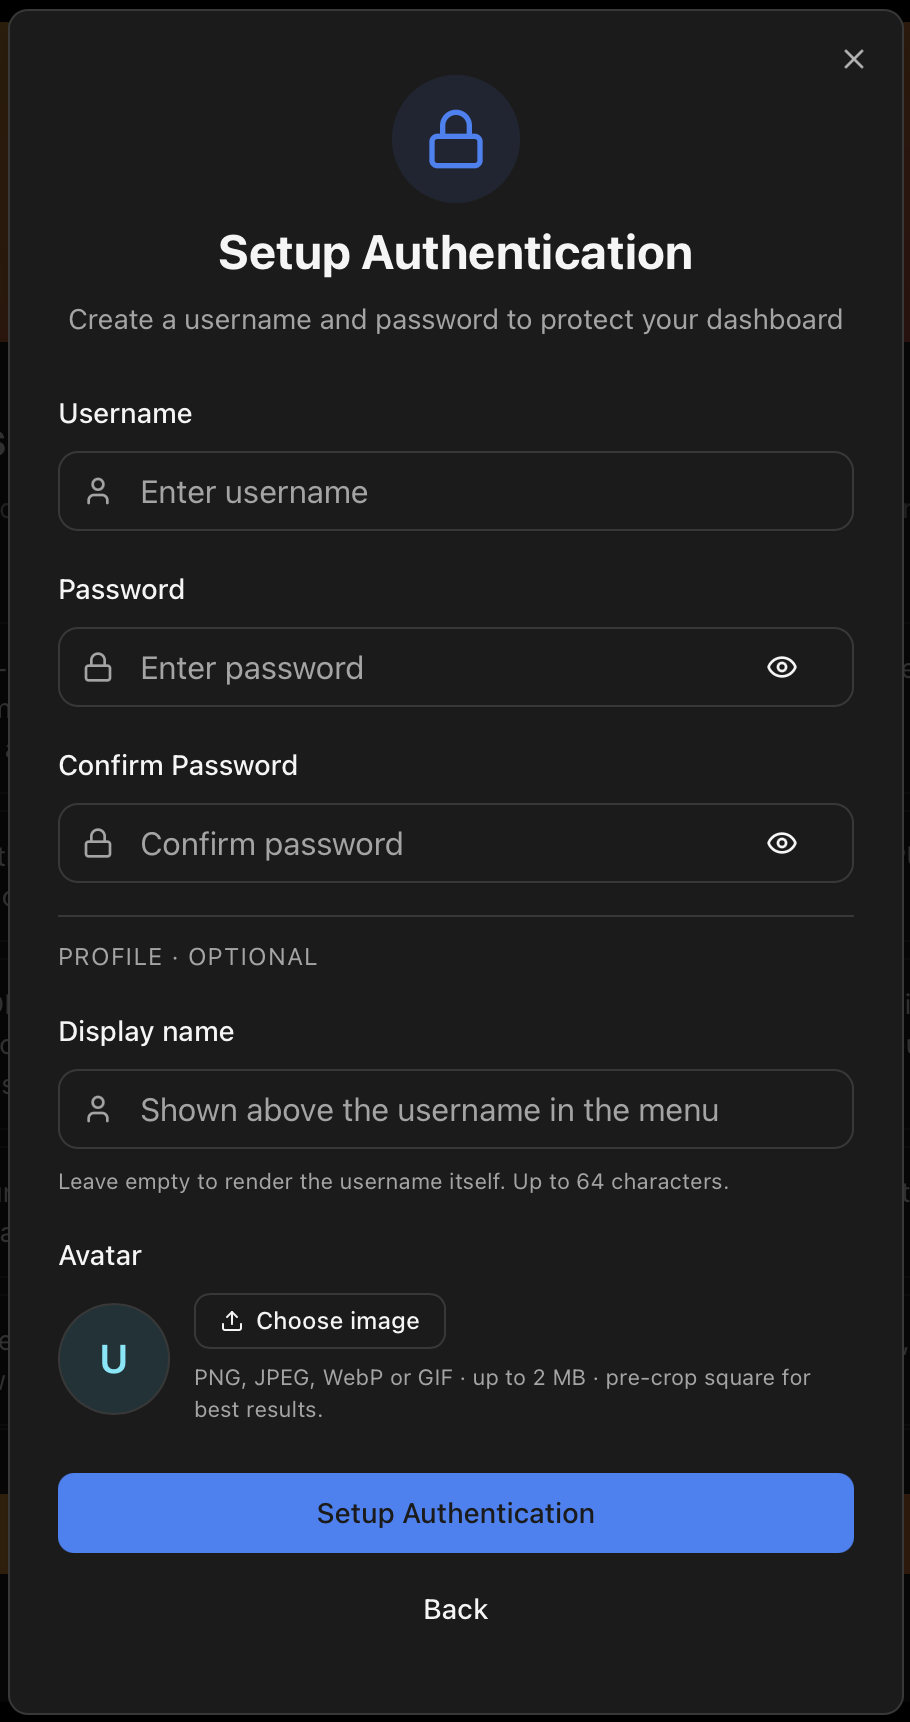
Clicking Yes, Setup Password opens a single form that creates the account and, optionally, seeds the user's profile in one go so the avatar appears in the header right after saving. The fields are:
| Field | Required | Notes |
|---|---|---|
| Username | Yes | The login identifier. Cannot be changed later from the UI; editing it requires touching auth.json directly. |
| Password | Yes | Minimum 10 characters, with at least 3 of the 4 categories (lowercase, uppercase, digit, symbol). A short list of obvious passwords (password, 12345678, proxmenux…) is rejected outright. The same rules are enforced server-side, so a curl call cannot bypass the front-end check. |
| Display name | No | Friendly label shown in the header dropdown and on the profile page. Falls back to the username when empty. Can be changed later from Avatar → View profile. |
| Avatar image | No | PNG, JPEG, WebP or GIF up to 2 MB. Rendered as a circle in the header and on the profile page. When empty, the header shows the first letter of the display name (or username) on a coloured circle. Can be uploaded, replaced or removed later from the profile page. |
One save, three API calls under the hood
POST /api/auth/setup first (username + password). On success it uses the freshly-issued JWT to follow up with PUT /api/auth/profile (display name) and POST /api/auth/profile/avatar (avatar bytes) if those fields were filled. Failures on the profile calls are non-fatal — the account is already created and you can finish the profile later from the dedicated page.Avatar menu and profile page
Once authentication is configured, an avatar circle appears at the top-right of every dashboard page next to the theme toggle. Clicking it opens a small dropdown with shortcuts to the profile page and the Security tab, plus a Sign out action — closing the session can be done from here or from the Security tab, whichever is closer to where you are.
The profile page itself is a small card with an avatar preview, the username (read-only), and the display name with an inline edit button. Avatar uploads, replacements and removals are atomic — the header avatar refreshes automatically when any of them succeed, so there is no need to reload the page. The same set of endpoints documented in the next section are used by both the create-user form and the profile page.
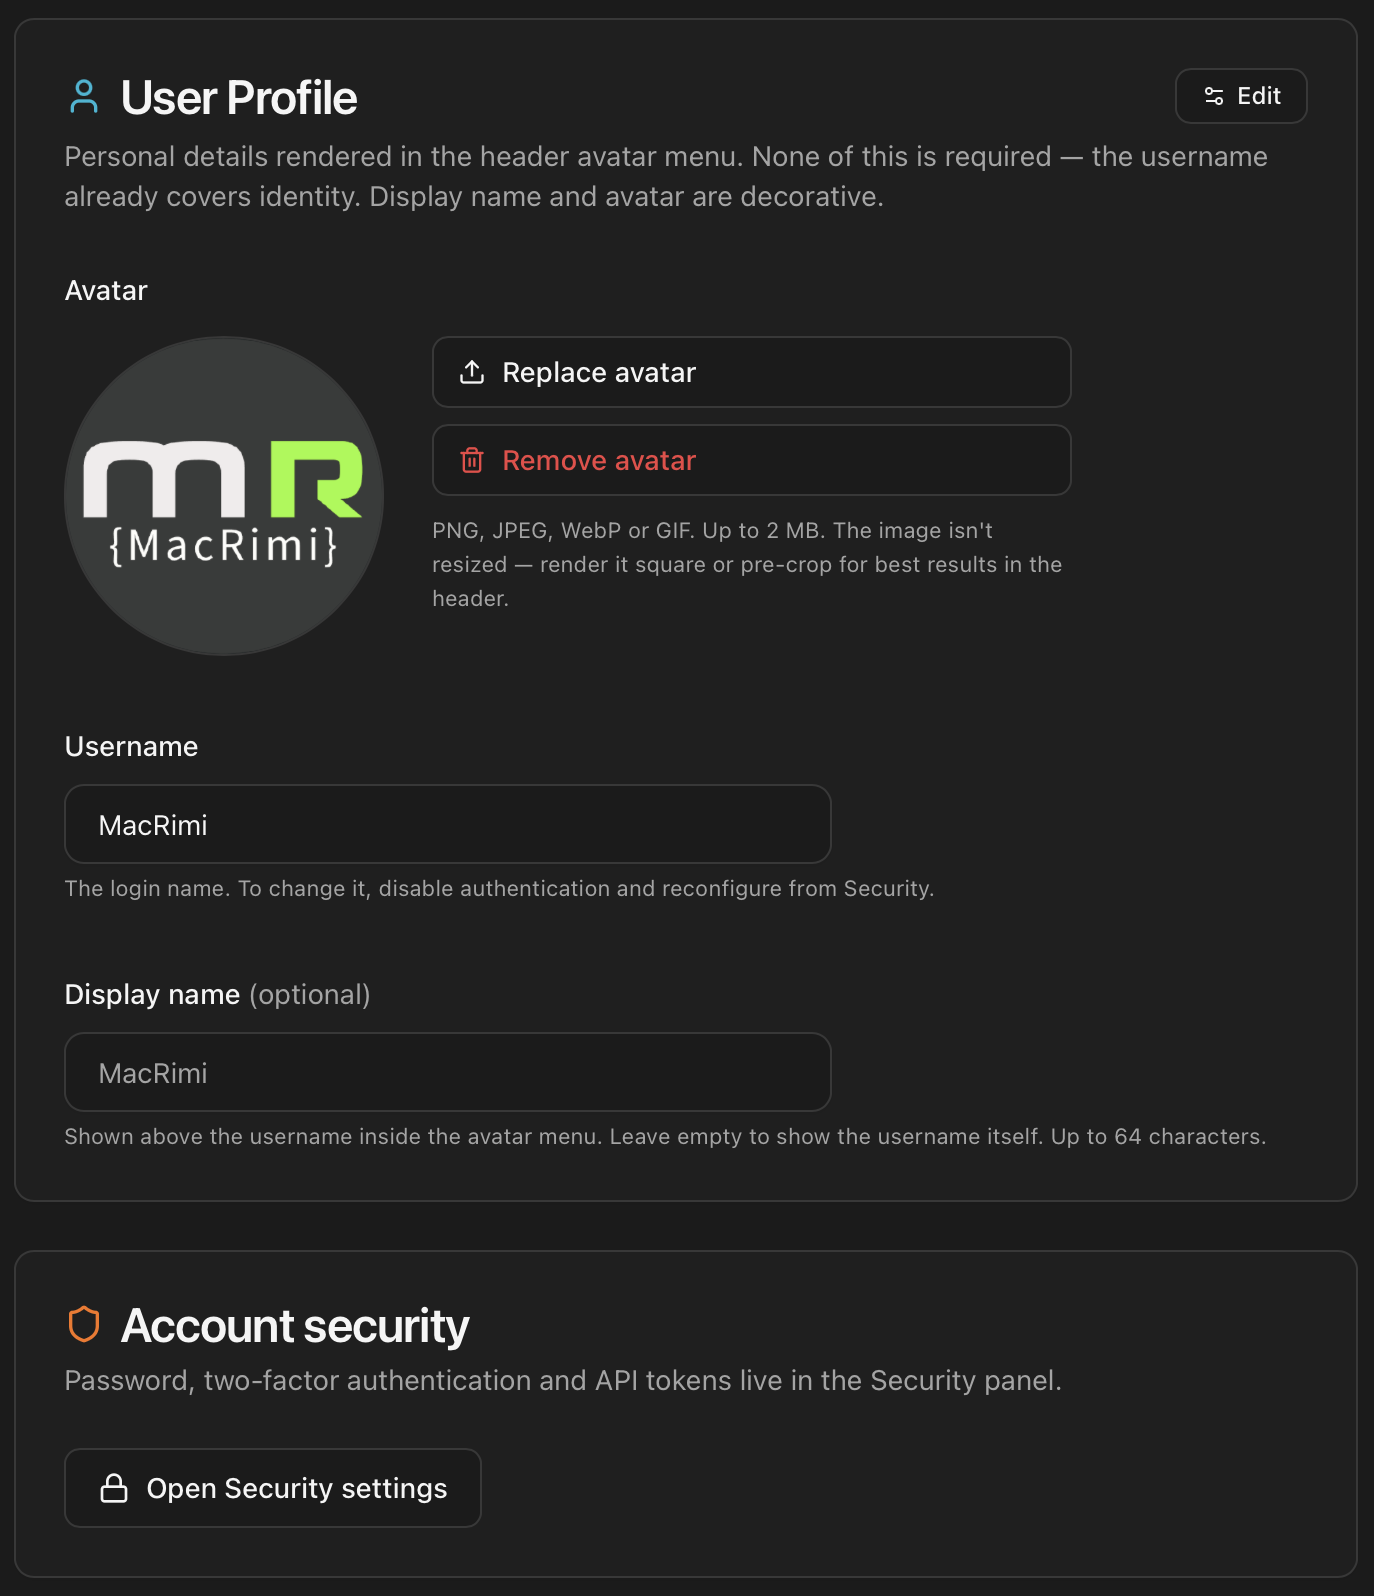
| Endpoint | What it does |
|---|---|
| GET /api/auth/profile | Returns the current username, display name and whether an avatar is set (has_avatar, avatar_mtime). |
| PUT /api/auth/profile | Updates the display name. Body: { "display_name": "..." }. |
| GET /api/auth/profile/avatar | Returns the avatar bytes (PNG / JPEG / WebP / GIF) with the matching content type. Requires the Bearer header — the front-end fetches it as a blob and converts to a local object URL for rendering. |
| POST /api/auth/profile/avatar | Uploads a new avatar (max 2 MB). Content type must match the file. Old avatar is replaced atomically. |
| DELETE /api/auth/profile/avatar | Removes the avatar. The header falls back to the initial-on-coloured-circle placeholder. |
Continuing without protection is reversible — but only from the host
/root/.config/proxmenux-monitor/auth.json and removing the declined flag, then restarting the service.Password authentication
After Set up, every API call (except the few public endpoints listed below) requires a JWT in Authorization: Bearer <token>:
- Session token (login): 24-hour expiration. Issued by
POST /api/auth/login. - API token (integrations): 365-day expiration. Issued by
POST /api/auth/generate-api-token. Documented separately in the next section.
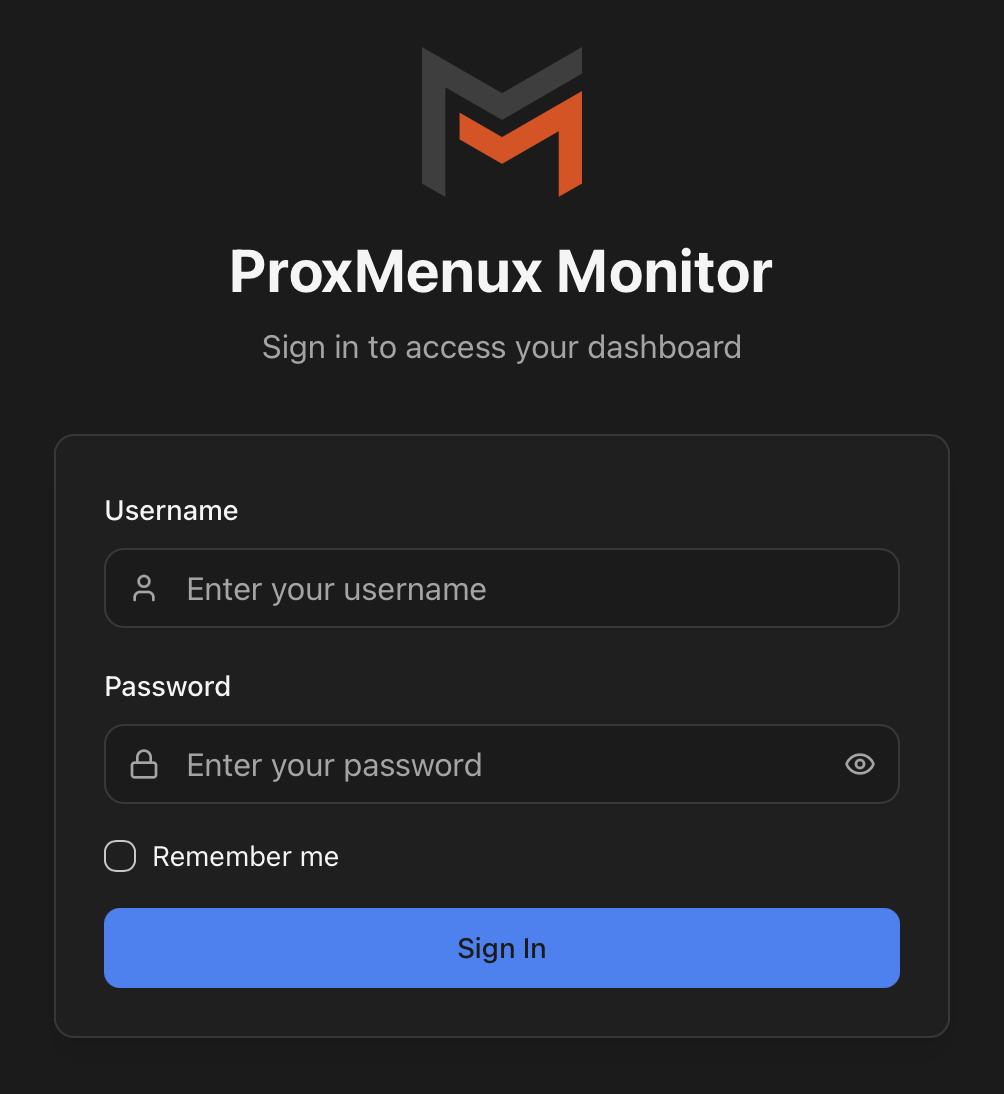
Login flow
# Without 2FA
curl -X POST http://<host>:8008/api/auth/login \
  -H "Content-Type: application/json" \
  -d '{"username":"<user>","password":"<password>"}'

# Response
{
  "success": true,
  "token": "eyJhbGciOiJIUzI1NiIs..."
}
With 2FA enabled, the same call returns requires_totp: true first. Re-issue with the 6-digit code:
curl -X POST http://<host>:8008/api/auth/login \
  -H "Content-Type: application/json" \
  -d '{"username":"<user>","password":"<password>","totp_token":"123456"}'
Public endpoints (no token)
These are the only endpoints that work without authentication, even when auth is enabled:
/api/auth/login,/api/auth/status,/api/auth/setup— the auth flow itself, by necessity./api/system-info— lightweight system snapshot (hostname, uptime,health.status). The right endpoint for external probes (Uptime Kuma, load-balancer health checks, status pages).
Cryptography and storage
ProxMenux Monitor is open source — none of this is secret. Documenting the stack here explicitly is a deliberate choice: operators who store credentials on their host deserve to know how those credentials are protected before they decide to trust them. The algorithms below are the same ones the code in scripts/auth_manager.py uses; this section is a contract, not a marketing promise.
| Asset | Algorithm | Where it lives |
|---|---|---|
| Password | PBKDF2-HMAC-SHA256 with a per-password random salt and a high iteration count (OWASP 2023+ baseline). Stored as pbkdf2_sha256$<iters>$<salt>$<hash>. | auth.json → password_hash |
| Session / API JWT | HS256 signed with a per-install secret minted at first launch (secrets.token_urlsafe, ≥48 bytes). Tokens carry iss=proxmenux-monitor + aud=api claims; the signature is validated against the current secret on every request. | Secret: auth.json → jwt_secret. JWT itself: only on the client. |
| API token metadata | SHA-256 of the JWT stored alongside a signed_with fingerprint of the jwt_secret used to mint it — used to display the token in the UI and to detect tokens whose signing secret has been rotated. | auth.json → api_tokens[] |
| 2FA TOTP secret | Standard TOTP (RFC 6238) base32-encoded. Backup codes are pre-generated, single-use, hashed with the same PBKDF2 scheme as the password. | auth.json → totp_secret + backup_codes[] |
| Revocations | When a token or session is revoked, its SHA-256 is added to a deny-list checked on every verification (mem-cached for ~30 s to avoid disk reads on the hot path). | auth.json → revoked_tokens[] |
auth.json — what it contains and how it's protected
/root/.config/proxmenux-monitor/auth.json, mode 0600, owner root. The file holds hashes (PBKDF2) and signing material (jwt_secret, totp_secret) — never a plaintext password. Treat it like any other root-only secret: if you back up or replicate the host, encrypt the destination, and never commit it to version control.Rotating jwt_secret invalidates all existing JWTs
auth.json is regenerated (manual delete, reinstall, restore from a backup with a different secret) the jwt_secret changes and every previously-issued JWT — both interactive sessions and long-lived API tokens — fails verification with "Invalid or expired token". The UI flags affected API tokens with an Invalid — regenerate badge so the operator knows to revoke and re-mint them; Home Assistant / scripts / any external client needs a fresh token after that.Recovering a lost password
There is no online "forgot password" flow — by design, since the dashboard runs on the operator's own host and the recovery path is shell access to that host. ProxMenux ships a guided reset inside the configuration menu so you don't have to hand-edit auth.json:
# 1. Run the ProxMenux menu as root
menu

# 2. Settings → Reset ProxMenux Monitor Password
#    The menu will:
#     - Back up auth.json to auth.json.bak-<UTC timestamp>
#     - Stop the proxmenux-monitor service
#     - Clear username / password_hash / TOTP secret / backup codes
#     - Keep jwt_secret and api_tokens intact
#     - Restart the service

# 3. Open the dashboard at http://<host>:8008
#    The setup wizard appears — create a new admin account.
What survives the reset
jwt_secret and the registered api_tokens are preserved — so Home Assistant and any other script using a long-lived API token continue to work without reconfiguration. If you want a fully clean slate (also rotate the JWT secret), delete auth.json manually and restart the service. The next launch generates a fresh secret and all old tokens become invalid.Physical-access prerequisite
menu as root can already do anything on the box, so giving them password reset is not a privilege increase. The corollary: if you let an untrusted user reach the Proxmox shell, the Monitor login won't protect anything that user couldn't already destroy by other means.Two-Factor Authentication (TOTP)
2FA adds a second factor on top of your password: a 6-digit code that rotates every 30 seconds, generated on a phone or password manager you control. Even if someone obtains the password, they still can't log in without the code from your device. ProxMenux Monitor implements the standard TOTP protocol (RFC 6238), so any authenticator app works.
Pick an authenticator app
If you already use one for Google / GitHub / your bank, that one will work — skip to the setup walkthrough. If not, here's a survey of common options. All of them are free; the differences are mainly about which platforms they run on and how (or whether) they back up your secrets.
| App | Platforms | Notes |
|---|---|---|
| Google Authenticator | iOS, Android | The default for many users. Optional Google-account cloud backup. |
| Microsoft Authenticator | iOS, Android | Microsoft-account backup. Also handles MS push notifications if you use them at work. |
| Authy | iOS, Android, desktop | Multi-device encrypted sync (the desktop app is being phased out — check the latest status). |
| Apple Passwords | iOS, iPadOS, macOS, visionOS, Windows (via iCloud) | Built into Apple OSes; standalone Passwords app since iOS 18 / macOS Sequoia. Stores TOTP next to the password and syncs across devices via iCloud Keychain. |
| Bitwarden | iOS, Android, desktop, browser | Open source. TOTP lives next to the password it protects (handy if you also use BW for passwords; defeats "separate device" if you don't). |
| 1Password | iOS, Android, desktop, browser | Same idea as Bitwarden — TOTP integrated with the password vault. Subscription. |
| Aegis Authenticator | Android | Open source. Encrypted on-device backup file you control. No cloud, no account required. |
| Raivo OTP | iOS, macOS | Open source. Optional iCloud sync. The Apple-ecosystem counterpart to Aegis. |
| Ente Auth | iOS, Android, desktop, web | Open source. End-to-end encrypted cloud sync across devices. |
| 2FAS | iOS, Android, browser extension | Open source. Optional encrypted cloud backup; browser extension can autofill codes. |
| FreeOTP+ | Android, iOS | Open source (Red Hat-led). Minimal — no cloud, no account. |
What "backup" really matters for
Step-by-step setup from the dashboard
- Install the authenticator app on your phone (or open your password manager). One of the apps from the table above. You only need to do this once — the same app will hold codes for every service you protect.
- Log into the dashboard with your username and password.
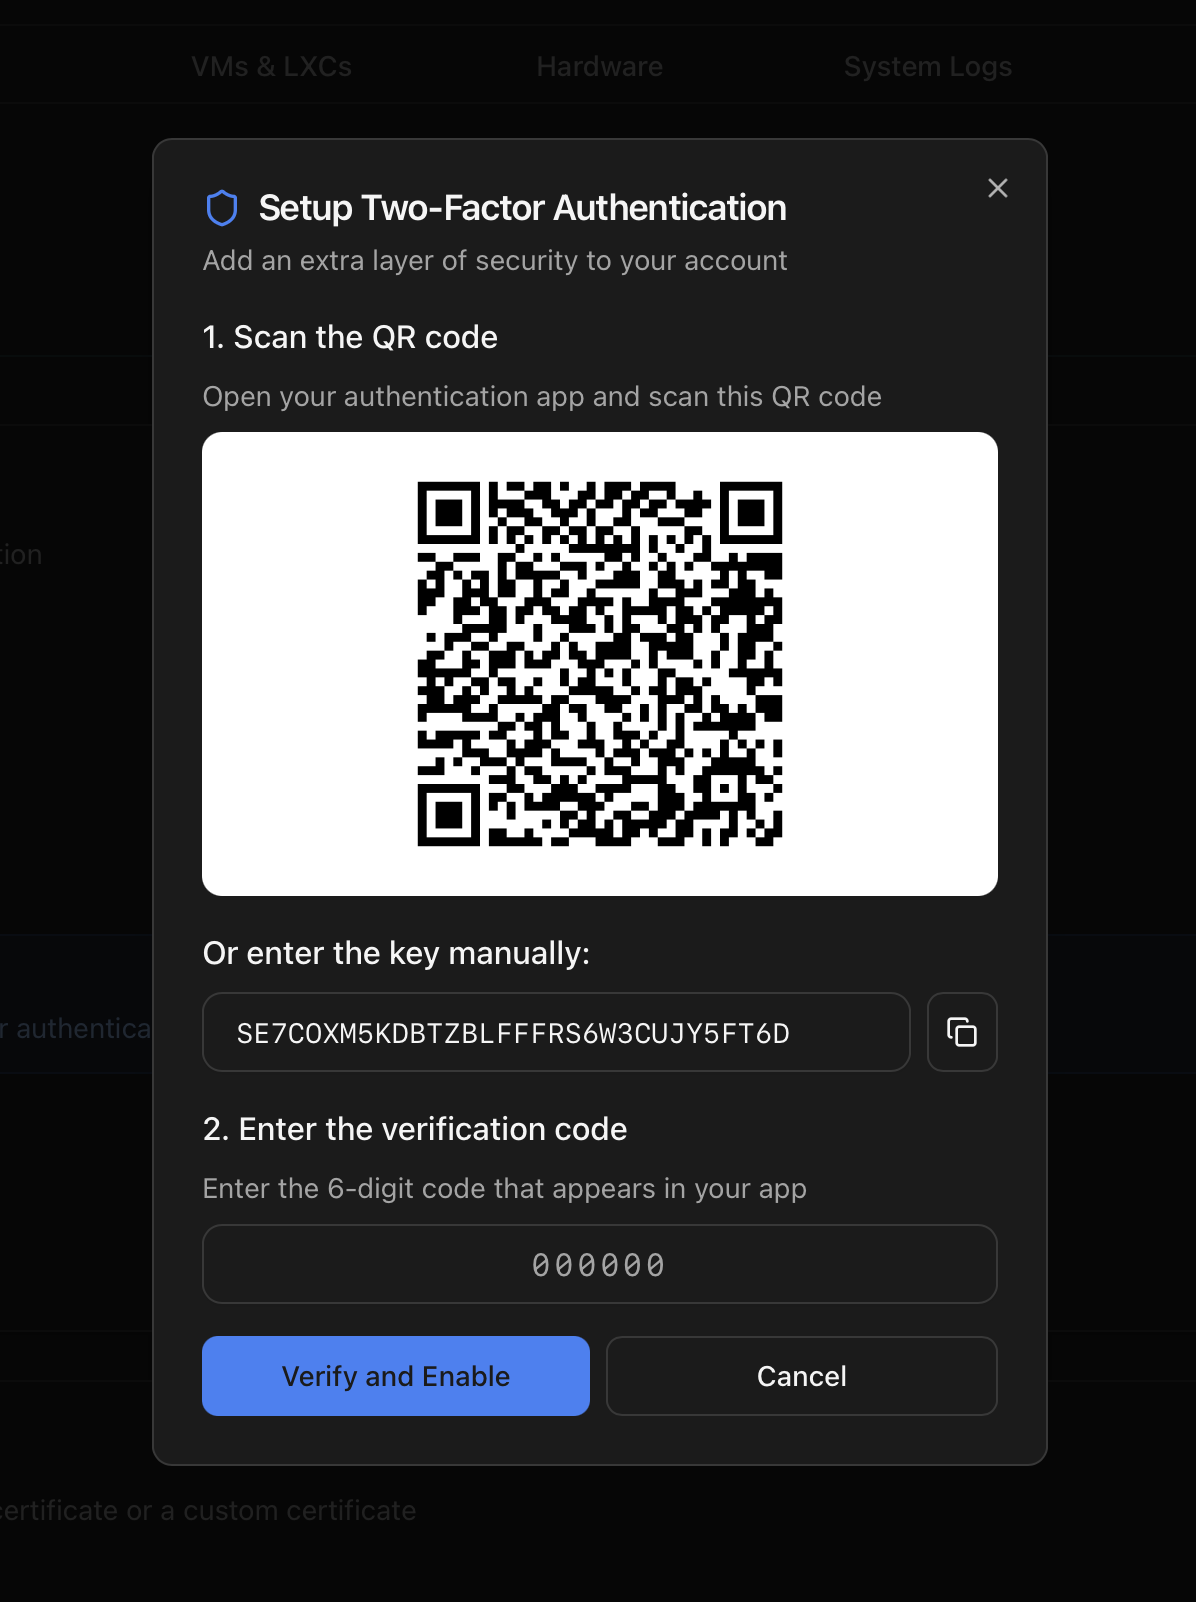
- Open the Security tab in the dashboard sidebar, then click Enable 2FA. A dialog opens with a QR code, a long string in Base32 format and ten short codes labelled "backup codes".
- Add the entry to the authenticator app:
- Easy path: in the app, tap Add account → Scan QR code, point the camera at the QR on the screen. The app names the entry automatically (something like
ProxMenux Monitor (your-username)) and starts showing a 6-digit code that refreshes every 30 seconds. - Manual fallback (when scanning isn't possible — e.g. setting up on the same phone you opened the dashboard with): tap Add account → Enter setup key. Type any name (e.g. Proxmox Monitor), paste the Base32 string from the dialog, leave Type as Time-based, save.
- Easy path: in the app, tap Add account → Scan QR code, point the camera at the QR on the screen. The app names the entry automatically (something like
- Save the backup codes. Copy the ten codes somewhere safe — a password manager, an encrypted note, a printed copy in a drawer. Treat them like spare keys: each works exactly once and gets you in if your phone is gone or broken.
- Confirm by typing the current 6-digit code from the app into the "Verification code" field of the setup dialog and submit. Codes refresh every 30 seconds, so if it expires while you're typing, just enter the next one.
- Done. 2FA is now active. Next time you log in, the dashboard asks for the password first; once it's accepted it asks for the current 6-digit code.
Test before logging out
auth.json on the host gets you back in.Lost authenticator
Three escape hatches, in order of how disruptive they are:
- Use a backup code. At the login screen, in the TOTP field, type one of the ten codes you saved at setup time. Each works once and is then consumed; the remaining codes still work. Once you're in, regenerate 2FA from Settings to get a fresh ten.
- Restore the authenticator from cloud / backup. If your app has a cloud sync (Google, Microsoft, Authy, Apple Passwords via iCloud Keychain, Ente, 2FAS) install it on a new device, sign in, and the entries reappear. If your app uses an encrypted export file (Aegis, Raivo, FreeOTP+), install the app on the new device and import the file.
- Disable 2FA from the host shell. When the previous options aren't available, edit
/root/.config/proxmenux-monitor/auth.jsonon the Proxmox host (you need root SSH or console access), settotp_enabledtofalse, save, and restart the service:systemctl restart proxmenux-monitor.service
You can log in with username + password only, then re-enable 2FA from Settings.
Disable 2FA
From the dashboard, open the Security tab and click Disable 2FA. The endpoint POST /api/auth/totp/disable requires the current password as confirmation, then deletes the TOTP secret and clears the backup codes. Remember to also remove the entry in the authenticator app — the app doesn't know the server side is gone, so the dead entry will sit there forever otherwise.
The 6-digit code is always rejected
- Phone: Settings → Date & Time → automatic / network sync ON.
- Proxmox host:
timedatectl status— "System clock synchronized: yes" should be visible. If not,timedatectl set-ntp trueand wait a minute.
API tokens (long-lived)
Browser sessions expire after 24 hours. For unattended integrations (Homepage widgets, Home Assistant sensors, Grafana scrapers, Uptime Kuma probes…) you generate a separate API token that lives 365 days. The token is a JWT signed with the same secret as the session token, but its token_name claim makes it easy to track and revoke individually.
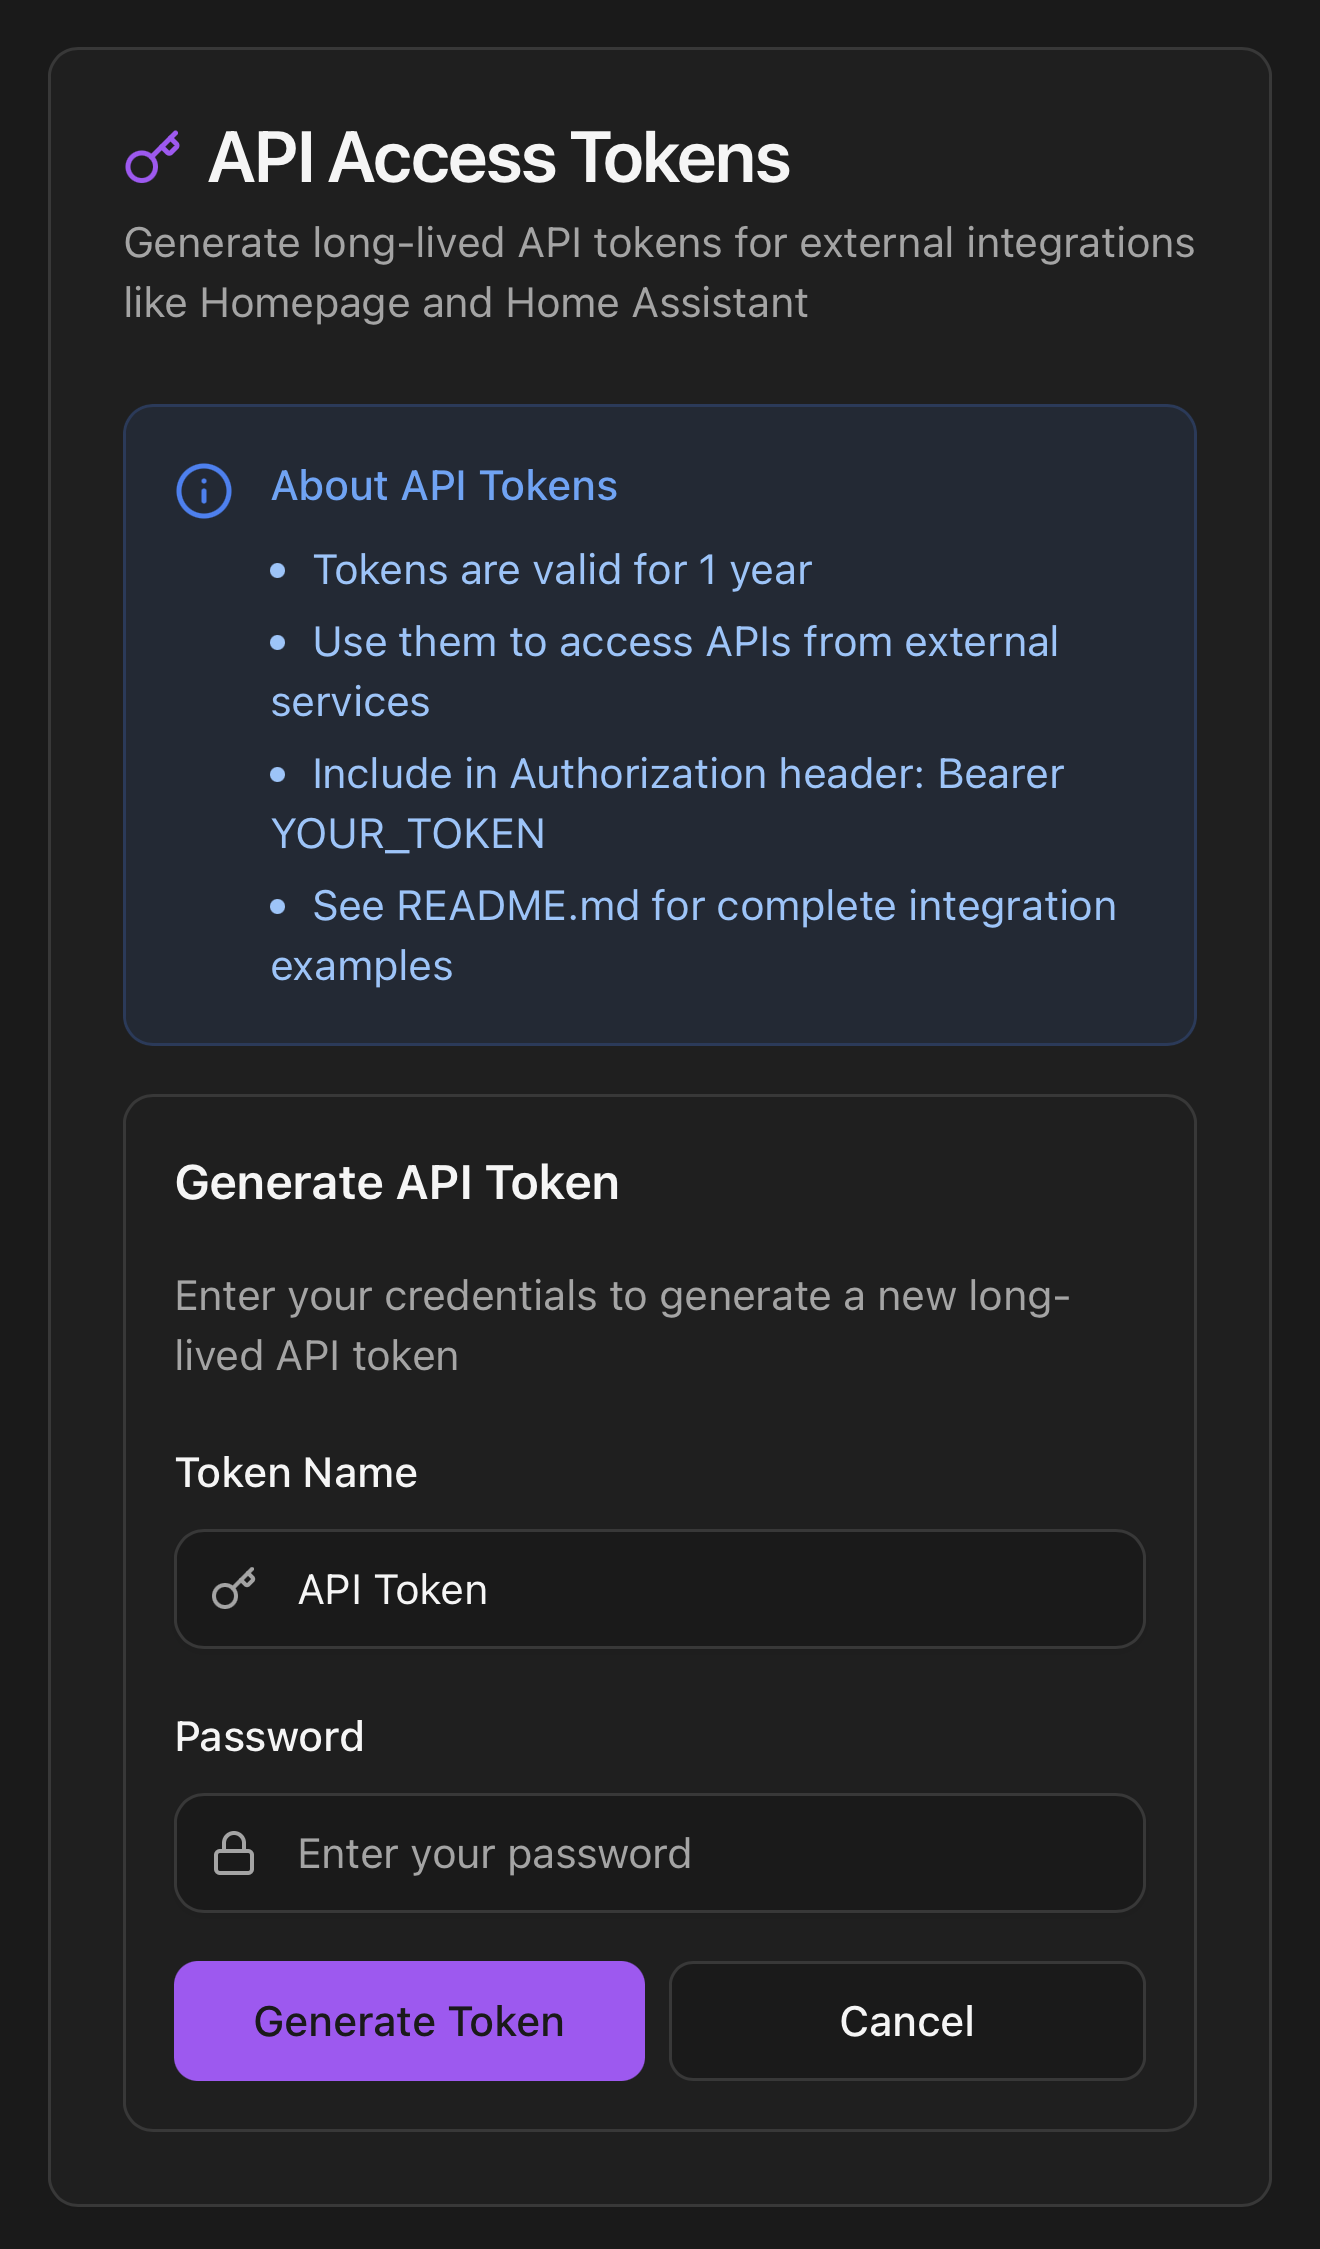
Generate a token
From the dashboard:
- Navigate to the Security tab → API Access Tokens section.
- Type a descriptive name (e.g. "Home Assistant").
- Re-enter your password. If 2FA is on, also the current 6-digit code.
- Click Generate Token. The token appears once — copy it immediately.
From the command line:
curl -X POST http://<host>:8008/api/auth/generate-api-token \
  -H "Authorization: Bearer <session-token>" \
  -H "Content-Type: application/json" \
  -d '{
    "password": "<your-password>",
    "totp_token": "123456",
    "token_name": "Home Assistant"
  }'

# Response — the "token" field is the only place the token appears.
{
  "success": true,
  "token": "eyJhbGciOiJIUzI1NiIsInR5cCI6IkpXVCJ9...",
  "token_name": "Home Assistant",
  "expires_in": "365 days"
}
Use a token
curl -H "Authorization: Bearer <api-token>" \
  http://<host>:8008/api/system
Revoke a token
From the panel above: each row has a Revoke action that adds the token hash to revoked_tokens in auth.json. Revoked tokens fail validation immediately on the next request.
# Same operation via API
curl -X DELETE http://<host>:8008/api/auth/api-tokens/<token-id> \
  -H "Authorization: Bearer <session-token>"
Token security cheat-sheet
- Store tokens in your integration's native secrets store — Homepage
secrets.yaml, Home Assistant!secret, environment variables, etc. Never commit them to git. - One token per integration, named after the consumer. Revoke individually when retiring an integration.
- Rotate every 6–12 months. The expiry is a hard limit, not a recommendation.
Full storage best-practices and integration recipes live in API Reference → Token Management and Integrations.
HTTPS
Two paths to TLS:
- Reverse proxy (recommended). Terminate TLS on Nginx / Caddy / Traefik and forward HTTP on port 8008 to the Flask process. Snippets below.
- Direct HTTPS in the AppImage. Configure a certificate via
POST /api/ssl/configure(UI: Settings → SSL). When SSL is configured the process switches from Flask's dev server togevent.pywsgiwith the gevent-websocket handler so WebSocket terminal also works over WSS. The cert files live wherever you point them; the paths are stored in the SSL config.
Direct HTTPS limitations
Secure Gateway (Tailscale)
Reverse proxies are the classic answer to "reach the dashboard from outside" but they require a public domain, certificate, and an open port on the edge. Secure Gateway is the zero-port alternative shipped inside the Monitor itself — a pre-built deployable app that spins up an Alpine LXC running Tailscale as a subnet router. Once joined to your tailnet, every device on it can hit the Monitor at the host's own LAN IP — from a laptop on holiday, a phone on 5G, or another node — without exposing TCP 8008 to the internet.
Why this is convenient
http://<proxmox-lan-ip>:8008 works everywhere Tailscale works. No certificates, no DNS, no port forwarding. The Monitor itself sees the request as coming from a tailnet IP (typically 100.x.y.z), so the auth log and the Fail2Ban hook still function as on the LAN.The deploy flow is one screen — pick the host LXC storage, paste a Tailscale auth-key (generated at login.tailscale.com/admin/settings/keys), choose which subnets to advertise, click Deploy. The LXC takes ~30 seconds to bootstrap and registers in the tailnet automatically.
Step-by-step deployment, subnet-routes configuration, Tailscale ACLs and Exit Node mode are documented separately in Dashboard → Security → Secure Gateway — that's where the deploy wizard lives in the dashboard UI. This page only covers the access pattern.
Reverse proxy snippets
The simplest layout is a dedicated host name for the Monitor (e.g. monitor.example.com) pointing at port 8008 on the Proxmox host. Snippets below use that pattern. Sub-path mounts (example.com/proxmenux-monitor/) are possible but require extra rewriting and are not the default — see the callout at the end.
Nginx
# /etc/nginx/sites-available/proxmenux-monitor.conf
server {
    listen 443 ssl http2;
    server_name monitor.example.com;

    ssl_certificate     /etc/letsencrypt/live/monitor.example.com/fullchain.pem;
    ssl_certificate_key /etc/letsencrypt/live/monitor.example.com/privkey.pem;

    location / {
        proxy_pass         http://127.0.0.1:8008;
        proxy_http_version 1.1;

        # WebSocket upgrade (terminal tab)
        proxy_set_header   Upgrade           $http_upgrade;
        proxy_set_header   Connection        "upgrade";

        # Real client IP — required for the auth log + Fail2Ban hook
        proxy_set_header   Host              $host;
        proxy_set_header   X-Real-IP         $remote_addr;
        proxy_set_header   X-Forwarded-For   $proxy_add_x_forwarded_for;
        proxy_set_header   X-Forwarded-Proto $scheme;
        proxy_set_header   X-Forwarded-Host  $host;

        # Long-running terminal sessions
        proxy_read_timeout 86400s;
        proxy_send_timeout 86400s;
    }
}
Caddy
# Caddyfile
monitor.example.com {
    reverse_proxy 127.0.0.1:8008 {
        # Caddy auto-handles WebSocket upgrades and forwards X-Forwarded-* by default.
        header_up Host {host}
        header_up X-Real-IP {remote}
    }
}
Traefik (labels — Docker / Kubernetes)
# docker-compose snippet, or equivalent IngressRoute on Kubernetes
labels:
  - "traefik.enable=true"
  - "traefik.http.routers.proxmenux.rule=Host(`monitor.example.com`)"
  - "traefik.http.routers.proxmenux.tls=true"
  - "traefik.http.routers.proxmenux.tls.certresolver=letsencrypt"
  - "traefik.http.services.proxmenux.loadbalancer.server.port=8008"
  # WebSocket and forwarded headers are on by default in Traefik.
Advanced: sub-path mounts under an existing domain
example.com/proxmenux-monitor/. The Next.js build uses relative asset paths so static files resolve, but the proxy must strip the prefix before forwarding so the Monitor still receives plain /api/* URLs. On Nginx that's a location /proxmenux-monitor/ } proxy_pass http://127.0.0.1:8008/; { (the trailing slash on proxy_pass does the strip). On Caddy, use handle_path /proxmenux-monitor/*. A dedicated host name is simpler.Audit log
Every authentication event (success and failure) is appended to /var/log/proxmenux-auth.log in a single line, syslog-style format:
# Failed login from 192.0.2.10 (real IP recovered from X-Forwarded-For)
2026-04-24 14:32:11 WARNING proxmenux.auth: authentication failure; rhost=192.0.2.10 user=admin

# Successful login
2026-04-24 14:32:18 INFO    proxmenux.auth: authentication success;  rhost=192.0.2.10 user=admin
Tail it the usual way: tail -F /var/log/proxmenux-auth.log. The file is rotated by logrotate if a config drop-in is added; the Monitor itself does not rotate it.
Optional: Fail2Ban jail
Fail2Ban is not bundled with the Monitor
When Fail2Ban is installed, the ProxMenux integration ships a [proxmenux] jail that:
- Reads
/var/log/proxmenux-auth.log. - Matches the
authentication failure; rhost=<ip>pattern with a dedicated filter. - Bans the offending IP at the kernel firewall level by default.
- Is queried by the Flask
before_requesthook every 30 s — so even when the firewall can't block (because the connection comes from the reverse proxy), the application returns HTTP 403 to banned IPs based on what Fail2Ban knows.
Configuration, ban time tuning and unban procedures are in Security → Fail2Ban.
Troubleshooting
The first-launch screen never appears
configured: true) or somebody already chose Skip. To start fresh:rm /root/.config/proxmenux-monitor/auth.json systemctl restart proxmenux-monitor.serviceThis wipes the auth state — also any TOTP secrets and API tokens. Back up
auth.json first if you have tokens you want to keep.HTTP 401 on every request from a working API token
revoked_tokens list. Generate a new one in Settings and update the integration. To check:curl -H "Authorization: Bearer <token>" \ http://<host>:8008/api/system | jq .Expired or revoked tokens return
{"error":"Invalid or expired token"}.Can't log in after enabling 2FA, no authenticator at hand
/root/.config/proxmenux-monitor/auth.json from a host shell, set totp_enabled to false, restart the service.Reverse proxy works but the terminal tab disconnects every minute
proxy_read_timeout 86400s; Traefik: idleTimeout in the entry-point or middleware) and confirm proxy_set_header Upgrade $http_upgrade and Connection "upgrade" are present.Where to next
- API Reference → Token Management — full lifecycle of API tokens (generate / list / revoke), security best-practices, secrets storage patterns.
- Integrations — Homepage, Home Assistant, Grafana / Prometheus, Uptime Kuma, generic cURL.
- Dashboard → Security → Secure Gateway — deploy the Tailscale gateway LXC step by step (subnet routes, ACLs, Exit Node mode).
- Security → Fail2Ban — how to install and configure the optional jail.
- Settings → ProxMenux Monitor — start / stop the systemd service from the ProxMenux TUI.